HTML5 AND CSS3
TUTORIAL 2
LINE BREAKS, PARAGRAPH AND HEADER
hey Everyone
how's it going it's Haris Ali
and welcome to
tutorial number 2
and in this
tutorial we are going to
start taking a
look at certain things
that we can put
in the body of our web
page
ok so the first
few things that we're
going to talk
about in this tutorial are
the line breaks
and paragraphs and headers
I'll
just go ahead and
I'll write some
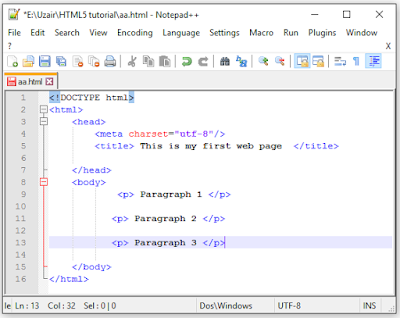
paragraphs are
here so this could be
paragraph 1
this paragraph 1 and you
think ok well i
can break down two lines
and this could be
paragraph 2 and then
and then you
think okay cool
i'm going to go
ahead and save this and
I should get
three
nice paragraphs
printed out in the
browser but
unfortunately that's not the
case
ok so if i go ahead
then i launched this
in Google
Chrome you can see that I've got
all three things
printed out on the
screen but they
all appeared in one line
what’s wrong going
on here
well let me
explain it to you this way
HTML is actually
wide space insensitive
so it doesn't
really matter how much
space we leave in
between yeah i mean i
could put in our
whole what is that like
probably 20
enters or something and when
i go back and
click refresh
nothing's changed
ok so that's why we
use these things
called tags
they basically
tell HTML
how to mark up
the text inside of them
ok so to break
down one line
what we do is we
use this break tag so
that is BR with a
forward slash just
like that
wanna break down
another line then I go
ahead and I'll
put one there as well
ok so now when I
save this and I go back
to Google Chrome
and click refresh you can see
we've got this on
line one
line two - and
line three
okay so they're
all on their own
separate lives
but that's
actually just
how to break down
a line
so this is the
equivalent of hitting
enter on your
keyboard
but if you guys
actually want to have
paragraphs and
paragraphs have spaces in
between these two
lines then we have to
go ahead and we
use a different tag
called the
paragraph tag so to do that
you're just going
to go ahead and put in
the smaller than
and greater than sign
with a and same thing
on the side as
well
ok so that is the
start of one of our
paragraphs and
then this is the end of
that paragraph
ok so we'll go
ahead and we'll do that
that was some kind of wrong but hey
we'll go back and
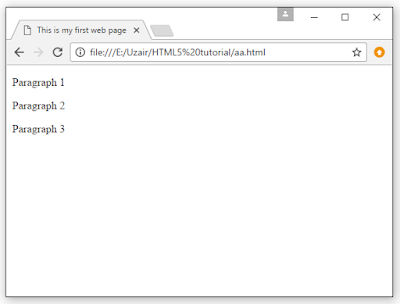
click refresh and now
as you can see
we've got these three
pretty cool
paragraphs all printed out
nicely on the
screen with space in
between them
ok so that's
quite cool
we've covered how
to actually break down
one line and we
also covered how to make
different
paragraphs so let's take a
look at how to
actually make headers on
the web page
ok now we
actually get six different
kinds of headers
by default
ok and they are
actually named h1 just
right down until
h6
so we've got h1
h2 h3 h4 h5 h6
and obviously
when you have to go ahead
and end these tags
ok and we can go
ahead and just
type some stuff
in here to see
what all these
headers come out looking
like
so this would be
the biggest header h1
is obviously the
biggest and then h6 is
going to be the
smallest
let's go ahead
and save this and now
when we go back
to Google chrome again and
click refresh you
can see we've got all
six headings is
printed out on our web page
starting from h1 being
the biggest
and h6 being
really really small that
you can't even
see it
ok so those are
the different headers
that we have
available to us in HTML but
we can change
these up a little that
which we will
learn about later on in
the series but
for now that's how to
make a header in
HTML
so thank you very
much guys don't forget
to subscribe
please feel free to leave a
comment like or
share the video
it's really going
to help my channel
grow and i'll see
you guys in the next
tutorial


No comments:
Post a Comment